By Lina Moreyra and Jan Borstein
Back in the day, we used to think that riding on skinny tires, inflated to the maximum pressure listed on the tire sidewall, would enable you to ride faster. We’re talking about 25mm tires inflated to 110 or even 120 psi. When that tire pressure made it feel like the fillings were about to rattle out of our teeth, we thought we were going really fast!
Over the last decade or so, lab research and testing with riders has shown that we can actually go faster — and be more comfortable — riding on wider tires at lower pressures. Further, a wider tire at lower pressure provides more contact (traction) between the tire and the road, so it’s safer when cornering and descending, especially on gravel. Win – win – win! And if you’re riding with a tubeless set up, your pressure can be lower still. Note that the proper tire pressure depends not only on the tire size in mm, but also the combined weight of the rider and her bike.

Are you over inflating your tires? Determining the ideal pressure for your tires depends on a number of factors, as explained below, but start with the tire width, the pressure range marked on the tire, and your weight.
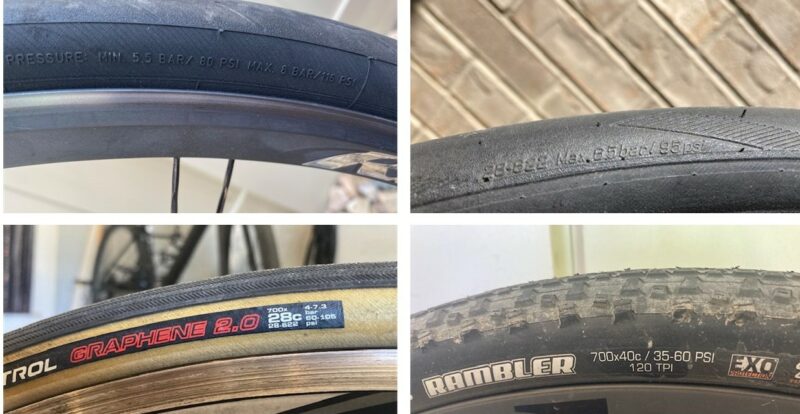
Tires usually show the recommended psi (pounds per square inch) or bar (metric units!) range on the sidewall as shown below. But what is the ideal air pressure for you? Let’s say a typical road bike tire recommends 80-100 psi, assuming the average-sized rider weighs 150-160 lbs. Lighter riders can lower the pressure by 5-10 psi, but not below 80, while a heavier rider can increase the pressure by 5-10 psi, but not above 100. Tubeless tires can operate at a lower pressure (65-75 psi) because without an inner tube, you don’t have to worry about pinch flats if you hit something like a rock, pothole or curb. Wider tires can handle a lower psi than skinnier tires. For instance, a 26mm road tire with a 150-160 lb. rider will operate well with 90 psi, while a wider tire (32mm) with the same rider can have a pressure of 85 psi. Gravel and Mountain bike tires follow the same recommendations and guidelines as above.
When inflating your tires, consider that the rear tire carries a bit more weight than the front tire, due mainly to riding position. Therefore, give your front tire a few psi less.
Experiment within the window recommended by the tire manufacturer, and see what pressure feels best to you, but ALWAYS stay within the range recommended.
Want to learn more? Below are links to sources that explain the details, as well as a couple of calculators to help you figure out the right pressure for your tires.
- The Pro’s Closet, Road & Mountain Bike Tire Pressure: A Beginner’s Guide With psi Chart goes into the factors to consider when deciding what pressure you should be running.
- Bicycle Guider, What Should Your Bike’s Tire Pressure Be, provides a good high-level view.
- Adventure Cycling, The Tire Pressure Revolution from 2015 by Jan Heine, provides a clear explanation, with some good technical details, if that’s your thing.
- The Gravel Ride Podcast, Rene Herse Cycles – Jan Heine Takes Us on a Gravel Tire Deep Dive. Deep dive is right! This 49-minute podcast focuses on gravel bikes, but the concepts apply to road bikes as well. The first 15 minutes are about Jan Heine’s career, which is interesting, but if you just want to get to the tire size and pressure discussion, skip to about minute 15. FYI, the transcript on the page is laden with errors, so don’t bother with that.
- The Rene Herse calculator is easy to use– you enter only the tire width (you can find that on your tire sidewall) and the combined weight of you and your bike. The calculator then suggests a range of pressures for a firm or a soft ride, depending on your preference.
- CS Bikes‘ calculator uses lots of inputs, including bike type (road vs gravel), rider weight, bike weight, wheel size, tire width, tire setup (clinchers with tubes vs tubeless), surface condition, and tire casing type. That’s a lot, but some of us are geeks, so may enjoy playing with this one. Interestingly, we found the results weren’t very different from the simpler Rene Herse calculator.
Comments are closed.